Capitalize with Ocean Protocol: A Predict ETH Tutorial

“How do I predict future asset prices?” is the multi-billion dollar question on every trader’s mind. Artificial intelligence can help to accurately predict asset prices. Indeed, the most robust predictive trading algorithms use machine learning (ML) techniques. On the optimistic side, algorithmically trading assets with predictive ML models can yield enormous gains à la Renaissance Technologies… Yet algorithmic trading gone awry can yield enormous losses as in the latest FTX scandal.
If you code an accurate price prediction model, then the next logical step is to trade with it. Sounds easy enough, right? But putting your faith in a trading algorithm is no easy task. Not only does it take significant coding & financial prowess to avoid (massive) trading errors, but it takes quite the emotional leap of faith too.
Don’t have the stomach for risk? Maybe you want 0% downside. Lucky for you, there’s a solution for that. Enter, Ocean Protocol.
Ocean Protocol’s open-source tools enable you to sell your algorithms without risk of others stealing your trade secrets. How?
This is a tutorial! We show, don’t tell ;)
Here we’ll teach you from start to finish how to create an algorithm for predicting ETH crypto prices and then upload your algorithm privately to the Ocean Market.
By the way, this is a purely educational tutorial — we’re not financial advisors! We authors give no warranty about the performance of this algorithm, nor should anything in this article be considered financial advice.
Moving on to the fun stuff…
Setting up our environment
First, we’ll set up our environment with a Prophet machine learning model to forecast prices. Easy peasy.
Profit with ‘Prophet’
Prophet is a forecasting algorithm originally developed by Facebook that uses additive models. In other words, Prophet sums several different functions that each fit pieces of a historical dataset to create one complete model for predicting future values. This forecasting model can be used for any kind of time-series data, but in this example we will use it to predict ETH crypto prices.
‘Explain Prophet’s additive models to me like I’m five years old.’
Prophet sums: 1) a combination of trend functions (including non-linear ones) with 2) seasonal inputs (including yearly, monthly, weekly and daily seasonalities) and 3) holiday effects (customizable to particular regions!). The result is a practical, real-world model that’s much more sophisticated than simple linear extrapolation. Pretty cool, no?
Prophet is implemented in Python, a widely used programming language for machine learning and artificial intelligence. It’s also open-source!
Find the full Prophet source code at https://facebook.github.io/prophet/
Installing Prophet
To install Prophet, you can use the pip command in your Terminal/Git Bash or an equivalent command based on your computer’s package-management system. We’ll install with pip here for ease of use with Python:
$ python -m pip install prophetThat’s it! Nothing complicated here.
If you have a fickle environment and encounter issues while installing, we’re here to help! Chat with the Ocean Protocol core team on our Discord with any questions!
Your Crystal Ball: Or how to make price predictions
All the code for creating the algorithm to predict ETH is here in a Jupyter notebook.
It’s time to use machine learning to forecast prices. We’ll be implementing a basic ML pipeline to forecast future prices for the Ethereum-Tether (ETH/USDT) cryptocurrency pair.
What is an ML pipeline? A machine learning pipeline usually consists of these steps:
- Data gathering and processing
- Machine learning modeling
- Model evaluation
- Model inference
Let’s collect and transform ETH price data from a reliable source into a format that we can use with our Prophet model.
ETH/USDT prices data can be downloaded from several places, but in this tutorial we’ll use Binance API for a simple solution to getting hourly ETH/USDT prices.
In your terminal, start the Python console.
$ pythonThen, enter the following steps each in a new line:
>>> import requests
>>> import pandas as pd
>>> url = "https://api.binance.com/api/v3/klines?symbol=ETHUSDT&interval=1h&limit=1000"
>>> r = requests.get(url)
>>> cex_x = r.json()
Note: The Binance API only works outside of the U.S. American users will need to either run a VPN or use a different data source.
In the snippet above, cex_x is an object of 500 data points, one for every hour, on the hour. Each data point has a list of 6 values: (0) Timestamp (1) Open price (2) High price (3) Low price (4) Close price (5) Volume. We will use the hourly “Close price” to make our price predictions.
More information regarding the Binance API is available in their documentation.
Initially, the timestamp is a Unix timestamp in milliseconds. We need to convert that Unix timestamp into a Python datetime object. We’ll convert the Unix time interval from milliseconds to seconds, then use a loop to convert the Unix timestamp into a list of Python datetime objects:
>>> from datetime import datetime
>>> uts = [xi[0]/1000 for xi in cex_x]
>>> ts_obj = [datetime.utcfromtimestamp(s) for s in uts]
The variable ts_obj contains the list of Python datetime objects. Remember, these datetime objects correspond to the Close prices of ETH/USDT coin pair on hourly intervals, but are not the Close prices themselves… We need to create a Python dataframe containing both the hourly timestamps and their Close prices.
Let’s create the Python Pandas dataframe using the first two lines of code below. Then, we will split the dataframe into a training set and a test set using the third and fourth lines of code below.
What is a training set and a test set? A training set is the data fed into the ML algorithm to model the behavior of the data for generating a forecast. A test set is the data your ML algorithm uses to see if its forecast is accurate. If the forecast isn’t accurate, then the algorithm revises its model. Thus, the machine “learns” from the test data.
We’ll use most of the hourly Close price data as our training set, but we’ll save the last 12 hours of Close prices to test our model.
>>> cls_price = [float(xi[4]) for xi in cex_x]
>>> dataset = pd.DataFrame({"ds": ts_obj, "y": cls_price})
>>> train = dataset.iloc[0:-12, :]
>>> test = dataset.iloc[-12:, :]
‘Fit’ for a model
The first step to using Prophet is instantiating a Prophet object. We create a Prophet object called model in the first two steps below. Then, we just call the fit function on our training set to create our forecasting model.
>>> from prophet import Prophet
>>> model = Prophet()
>>> model.fit(train)
Et voilá, our Prophet model is created and we can start to predict hourly ETH/USDT crypto prices!
But how accurate is our model, really?
Cross Validation Testing
One way to significantly improve our ML model’s accuracy is by using cross validation. Cross validation will help us with two things: 1) selecting the additive functions correctly that create the model and 2) making sure that the model doesn’t fit the training data too closely to reduce noise.
Additive functions individually model data’s behavior and add together in sequence to create one unified model for the data. Noise is the small, high frequency fluctuations in ETH/USDT prices over time. Since our Prophet model is fitted perfectly to our data including all that noise, Prophet’s forecasted prices will likely deviate from general trends in the data because noise generates a greater number of additive functions in the model.
What we need is a way to smooth out our Prophet model’s functions to eliminate some of the noise and predict more generally the direction of future ETH/USDT prices.
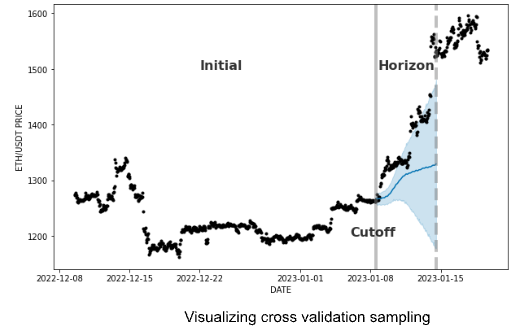
How does cross validation work?
Cross validation takes the training set and splits it into chunks for re-training and testing the model. Starting from an initial time in the past, each chunk has an equivalent timespan called a Horizon to evenly cross validate. The very first horizon is used to train the model, then the second horizon is used to test your model. This pattern repeats in chunks until a final Cutoff time in the training set.
The ML algorithm tests one last time its model on the data after the cutoff. Then, the error is computed and the ML model does its final tuning.
All that to say, we can cross-validate with just a few elegant lines of code:
>>> from prophet.diagnostics import cross_validation
>>> df_cv = cross_validation(model, initial='30 days', period='1 hour', horizon = '12 hours')>>> df_cv = cross_validation(model, initial=’30 dys’, period=’1 hour’, horizon = ’12 hours’)
Computing the Mean Squared Error (MSE) is just as easy:
>>> from prophet.diagnostics import performance_metrics
>>> df_p = performance_metrics(df_cv)
You can see in the chart below that the MSE of the prediction increases as we try to predict further in time, which makes sense because uncertainty increases over time.
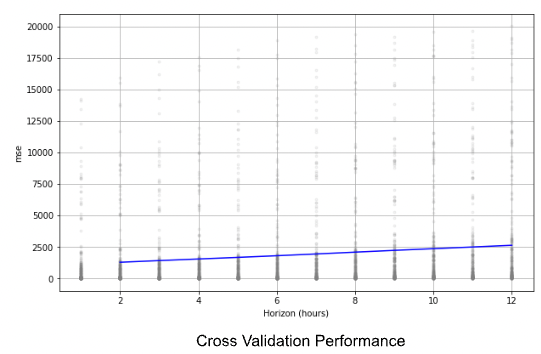
Now that we have a working and cross validated ETH price prediction model, let’s see how closely it modeled the data overall using the NMSE metric.
How good are we at predicting future ETH prices?
We’ll calculate the Normalized Mean Squared Error (NMSE) to assess the accuracy of our cross validated Prophet model. Why? NMSE is the de facto measurement for comparing the accuracy between various ML models, so it will give us a good sense of how we stack up with the competition. Let’s compute the NMSE:
>>> import numpy as np
>>> forecast = model.predict(test)
>>> mse_xy = np.sum(np.square(np.asarray(test["y"]) - np.asarray(forecast["yhat"])))
>>> mse_x = np.sum(np.square(np.asarray(test["y"])))
>>> nmse = mse_xy / mse_x
In this code, the variable nmse is the error of the model performing in the unseen test set. The following chart shows a 12 hour ETH price prediction. The dotted line divides the historical data used for training and the unseen testing data.
And indeed, things are on the up and up 🙂 It’s time to monetize our trade secret ETH price prediction algorithm…
Ocean Protocol
Ocean Protocol builds open-source tools to monetize datasets and algorithms on the blockchain. Publishers of datasets and algorithms can use Ocean Protocol tools to mint their own data NFTs (including metadata) and grant access to these NFTs using data tokens.
You can learn more about Ocean Protocol in the Ocean Academy.
In this tutorial, we’ll create a data NFT to store our ETH price prediction algorithm and grant access to it for paying consumers.
Installing Ocean is just one command:
$ python -m pip install ocean-libIf you encounter issues, ping us on Discord and the Ocean team will help you! Our official docs are also a reference.
Let’s set up our environment by creating an Ocean object on our blockchain of choice. We’ll use Polygon in this example for its low gas fees.
>>> from ocean_lib.ocean.ocean import Ocean
>>> from ocean_lib.web3_internal.utils import connect_to_network
>>> from ocean_lib.example_config import get_config_dict
>>> connect_to_network(“polygon”)
>>> ocean = Ocean(get_config_dict())
Next, we have to connect our wallet (Alice impersonates the owner of the wallet in the steps below)
>>> # Assuming the private key comes from env var
>>> import os
>>> from brownie.network import accounts
>>> alice_private_key = os.getenv(‘REMOTE_TEST_PRIVATE_KEY1’)
>>> accounts.clear()
>>> alice_wallet = accounts.add(alice_private_key)
Now we’re ready for compute-to-data. Drumroll, please!
Compute-to-Data
Compute-to-data (C2D) is a functionality within the Ocean tech stack that allows data consumers to buy the results of computation on a dataset (i.e. AI model or other data outputs) rather than purchasing the dataset directly.
In this case, data publishers can upload an algorithm to the Ocean Marketplace by creating an asset through the Ocean Library. The output of this algorithm can then be sold to other users in the marketplace. In other words, data and algorithm owners can monetize this IP while preserving the privacy of the data contents.
First, the algorithm should be uploaded to a repository — Github for example. Then, the URL from the algorithm is used in the following way to create the asset in the marketplace:
>>> ALGO_url = “https://raw.githubusercontent.com/<repository>/<file>.py"
>>> (ALGO_data_nft, ALGO_datatoken, ALGO_ddo) = ocean.assets.create_algo_asset(name, ALGO_url, alice_wallet, wait_for_aqua=True)
>>> print(f"ALGO_ddo did = '{ALGO_ddo.did}'")
The URL of the algorithm is only visible to Ocean Protocol’s technology, but the URL is encrypted to the users who buy the asset. The key printed above is the identifier for the asset created in the marketplace.
We’re done! The output DID is your algorithm asset’s digital identifier that proves it exists now on the Polygon blockchain. This asset can now be bought on the Ocean Market to compute on data and output those predictions to purchasers.
Congratulations!
Conclusion
We trained a forecasting ML model to make predictions about the future values of ETH/USDT crypto pair. We explored how to transform algorithms into sealable assets using the Compute-to-Data (C2D) feature. The end result? Those who follow this tutorial can sell predictions for ETH/USDT for any point in time through the Ocean Market using C2D, allowing you to monetize your IP. This example is only one of the many possible applications of the Ocean Protocol. To find more visit Ocean Academy!