Deploy an IBM Watson Studio Model on AWS Sagemaker
Introduction
This article shows how to build a machine learning model on a Watson Studio platform running on IBM Cloud Pak for Data (CPD). You can then export the model and deploy it on Amazon Sagemaker on Amazon Web Server (AWS). You can leverage both platforms to bring a machine learning model from development to production with maximum flexibility.
The example model predicts how likely a customer is to enroll in a Demand Response Program of a Utilities Company. The Demand Response Program is what utilities companies can offer to residential and commercial customers to support energy demand balancing. In exchange for discounted rates, customers agree to reduce energy demand during periods of peak usage. The sample data used to train the model contains customer demographic data, retail details, and historical energy usage.
You can review the steps in this article to familiarize yourself with the process. If you are set up with the required systems, you can download the sample project and complete the steps for hands-on learning.
This sample uses the following platforms:
- Watson Studio and Watson Machine Learning with a Python 3.9 environment running on IBM Cloud Pak for Data as a Service
- Amazon Web Server (AWS) environment with S3, Amazon Sagemaker, and ECR provisioned
IBM Watson Studio on CPD empowers data scientists, developers, and analysts to build, run and manage AI models and decision optimization solutions in a cloud or on-premises environment. This article shows how you can use a no-code or all-code approach for training a machine learning model in Watson Studio that you can then deploy on AWS.
Amazon SageMaker is a machine-learning platform that enables developers to create, train, and deploy machine-learning models in the cloud. SageMaker also enables developers to deploy ML models on embedded systems and edge-devices.
The process for building on CPD and deploying on AWS follows this sequence:

Creating and exporting a model in Watson Studio
This section steps you through training and downloading a sample model in Watson Studio that you can deploy on AWS. Follow the steps to create a sample model. If you already have a trained machine learning model, start with Step 3 for instructions on how to extract the model file in a format you can use to deploy on AWS.
Step 1: Import or download the sample project in Watson Studio
The Utilities Demand Response Prediction sample project is stored in the CPDaaS Gallery. The project includes the data file (demandresponseinput.csv) for training the predictive model and a sample notebook (utilities-demand-response-prediction-training.ipynb) set up to create, train, and save the model. Use one of these methods to set up the sample project:
- CPD: Download the project as a zip file and import it into your CPD environment.
- CPDaaS: Add the project directly to your account.
Step 2: Create a machine learning model in Watson Studio
Choose a method for creating the Demand Response model in the sample project. You can:
- Run the Jupyter notebook included in the sample project. The notebook builds and trains the model and saves the model as a project asset.
- Use AutoAI for an automated, no-code approach for building and training the model using the sample data. You can then save the resulting model as project asset.
Step 2a: Run the sample notebook to create the scikit-learn model
- Open the notebook in the sample project.
- Follow the steps for supplying the authentication credentials and environment.
- Run the notebook cells.
The notebook uses scikit-learn transformers to prepare the data, test different types of algorithms, select the top performing model, and combine it all in a final pipeline. Finally, it saves the pipeline as a model asset in the Watson Studio project.
Step 2b: Use AutoAI to create the scikit-learn model
- Create an AutoAI experiment in the sample project and name it Utilities Demand Response. Add the sample data file, demandresponseinput.csv as the training data for the experiment.
- Click No to creating a time series experiment.
- Choose DEMAND_RESPONSE As the prediction column. This sets up a binary classification model that will predict the likelihood of a new customer enrolling in the program.
- Click Run to create the experiment, which will train candidate model pipelines for the experiment.
- When the experiment is complete, click Save as model for the top-ranked pipeline. This saves the machine learning model as a Watson Studio project asset using the name and the pipeline algorithm to identify it (for example, Utilities Demand Response — P4 Extra Trees Classifier).
For more details on how to run an AutoAI experiment, see Building an AutoAI model.
Step 3: Export and download the model file
In this step you will export the machine learning model you created as a zip file, then convert the file to .pkl format for deploying with AWS Sagemaker.
- From the Assets view of the project, export the project and select only the model to download the project and model file as a zip file.
- Save the model with .pkl extension.
- Extract the project zip file.
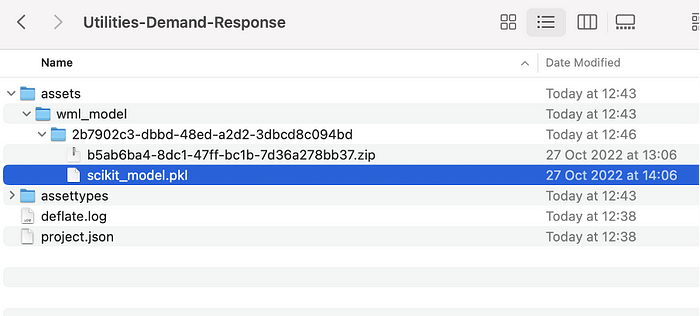
- Navigate to `Utilities-Demand Response -> Assets -> wml_model` to find your model by model ID, as shown here:
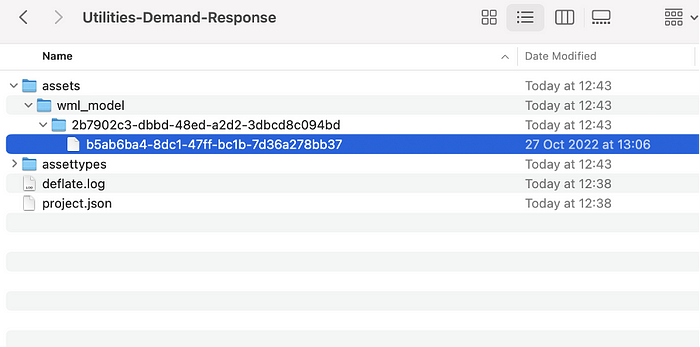
- The model is in a compressed (zip) format. Extract the file. Note: you might have to first rename it to append the .zip or the .tar.gz suffix if you can’t extract the file. Extracting the model file displays the `scikit_model.pkl` component, which you need for the next step. Rename the pickle file to `scikit_model.pkl`` if you are using auto-ai method.
Deploying a model in .pkl format using Sagemaker
This section demonstrates how to use Sagemaker to deploy the model you created on Watson Studio on AWS. There are two methods for deploying the model:
- Run one of the sample notebooks provided to deploy the scikit_model.pkl file.
- Use the template provided to containerize the model using a Docker image, then deploy the container.
Log in to Sagemaker on AWS, then follow the steps for your preferred deployment method.
Deploy the model to Amazon Sagemaker for inference using a notebook
1. Clone the Github folder that corresponds to the type of model you exported from Watson Studio (Scikit-learn or autoai). For details on cloning a Github repository to Sagemaker, see this article.
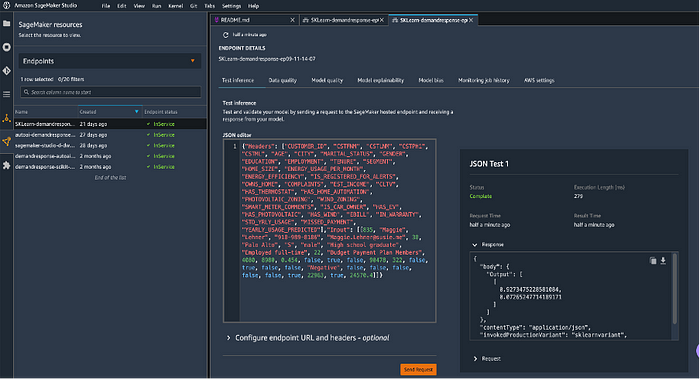
2. Open the notebook Deploy WS Sci-kit model.ipynb or Deploy Auto-AI Model.ipynb and run the cells step by step to import the model as a Sagemaker asset, then deploy the model and generate an endpoint on Amazon Sagemaker.
3. Test the endpoint using the notebook or use this endpoint sample payload to test the deployment in the Sagemaker UI:
{“Headers”: [“CUSTOMER_ID”, “CSTFNM”, “CSTLNM”, “CSTPH1”, “CSTML”, “AGE”, “CITY”, “MARITAL_STATUS”, “GENDER”, “EDUCATION”, “EMPLOYMENT”, “TENURE”, “SEGMENT”, “HOME_SIZE”, “ENERGY_USAGE_PER_MONTH”, “ENERGY_EFFICIENCY”, “IS_REGISTERED_FOR_ALERTS”, “OWNS_HOME”, “COMPLAINTS”, “EST_INCOME”, “CLTV”, “HAS_THERMOSTAT”, “HAS_HOME_AUTOMATION”, “PHOTOVOLTAIC_ZONING”, “WIND_ZONING”, “SMART_METER_COMMENTS”, “IS_CAR_OWNER”, “HAS_EV”, “HAS_PHOTOVOLTAIC”, “HAS_WIND”, “EBILL”, “IN_WARRANTY”, “STD_YRLY_USAGE”, “MISSED_PAYMENT”, “YEARLY_USAGE_PREDICTED”],”Input”: [[835, “Maggie”, “Lehner”, “918–989–8186”, “Maggie.Lehner@susie.me”, 38, “Palo Alto”, “S”, “male”, “High school graduate”, “Employed full-time”, 22, “Budget Payment Plan Members”, 4080, 8980, 0.454, false, true, false, 90478, 322, false, true, false, false, “Negative”, false, false, false, false, false, true, 22963, true, 24570.4]]}
Deploy Watson Studio model with Amazon Sagemaker using a container
If you prefer to deploy a containerized model using a Docker image, follow these steps. This example uses the AutoAI model but you can use the same steps for the Scikit-learn model.
- Clone the GitHub folder into Amazon Sagemaker. For details on cloning a Github repository to Sagemaker, see this article. The Readme file in the folder provides details for each file.
- Open the notebook Containerise Auto-AI Model Pipeline.ipynb and run the cells step by step to deploy the container and generate an endpoint on Amazon Sagemaker.
- Test the endpoint using the notebook or use this endpoint sample payload to test the deployment in the Sagemaker UI:
{“Input”: [[4, “Nicolas”, “Baumbach”, “507–490–8532”, “XXXXXXXX”, 37, “Santa Clara”, “M”, “male”, “Bachelor’s degree or more”, “Employed full-time”, 33, “Budget Payment Plan Members”, 1450, 4330, 0.335, true, true, false, 64792, 257, false, false, false, true, “Positive”, true, true, false, false, false, true, 52098, 0, 51577.02]]}
Conclusion:
Combine the power of Watson Studio on Cloud Pak for Data with Sagemaker Studio on Amazon Web Server for maximum flexibility for building machine learning models and bringing them to production. In this blog we reviewed the steps for using no-code or pro-code tools to create a machine learning model in Watson Studio, then we demonstrated techniques for deploying the model on AWS. By following the steps in this article and modifying the scripts for your needs, you can easily leverage the model-building capabilities of Watson Studio, including the low-code approach of AutoAI, with the deployment capabilities of Amazon Web Server, including the opportunity to deploy your machine learning models on embedded systems and edge devices.
Authors:
References:
Access all of the code used in this tutorial here: https://github.com/IBM/WatsonStudio-Sagemaker-Integration
Bring your own container: https://github.com/aws/amazon-sagemaker-examples/tree/main/advanced_functionality/scikit_bring_your_own/container
Bring your own container with Amazon Sagemaker: https://towardsdatascience.com/bring-your-own-container-with-amazon-sagemaker-37211d8412f4
