Logo:
Logo:  Areas Served:
FastAPI Template for LLM SaaS Part 1 — Auth and File Upload
Last Updated on November 20, 2023 by Editorial Team
Author(s): Euclidean AI
Originally published on Towards AI.
FastAPI has been getting a lot of traction in the Python backend developer community lately, thanks to its simplicity, asynchronous nature, and native Swagger UI.
Among those popular LLM open-source projects on GitHub, Quivr is one of the best and has lots of stars (24.2k at the time of writing) and well-structured code base. First of all, I would like to pay tribute to this repository and its contributors for their great work for making such a good reference project for the Python community.
GitHub – StanGirard/quivr: U+1F9E0 Your supercharged Second Brain U+1F9E0 Your personal productivity…
U+1F9E0 Your supercharged Second Brain U+1F9E0 Your personal productivity assistant to chat with your files (PDF, CSV) & apps…
github.com
There is a lot of good stuff we need to go through from this repository, and furthermore, we would like to set up a template based on this repository for any future LLM use cases. Therefore, I decided to split this into two articles. In this article, we will focus on the following:
- High-level architecture
- Supabase Auth with FastAPI
- File Upload with Supabase
In part 2, we will cover:
- Celery worker and message queue for long-running process
- pg-vector plug-in in Postgres
In part3, we will cover:
- FastAPI for ChatGPT, like streaming payload
- Stripe Payment
- API testing
- Template for any future use cases
High-Level Architecture
The backend architecture consists of three main parts: Supabase DB, FastAPI backend server, and Celery server. Celery is used for long-running background tasks, e.g., embedding a large PDF document. Between FastAPI and the Celery server, Redis is used as a message broker. Communication to Supabase from FastAPI/Celery is via Supabase client (Python SDK)
Supabase Auth
Supabase is an open-source Firebase alternative. It is essentially a Postgres database, but it has other built-in features, e.g., auth, edge functions, blob storage, pg-vector, etc., which streamlines the dev works compared to using a Postgres DB from scratch.
With supabase auth, you can simply call the signUp() and signIn() functions from the supabase client library. The following shows you an example in JavaScript (source:https://supabase.com/docs/guides/auth/social-login) .
async function signUpNewUser() {
 const { data, error } = await supabase.auth.signUp({
 email: '[email protected]',
 password: 'example-password',
 options: {
 redirectTo: 'https//example.com/welcome'
 }
 })
}
async function signInWithEmail() {
 const { data, error } = await supabase.auth.signInWithPassword({
 email: '[email protected]',
 password: 'example-password',
 options: {
 redirectTo: 'https//example.com/welcome'
 }
 })
}
async function signOut() {
 const { error } = await supabase.auth.signOut()
}
This is the frontend code, so what to do at the backend??
Good question. With the interaction between your frontend and Supabase, Supabase actually creates a table called auth.users. This table sits under Authentication section on Supabase dashboard.

Any future tables that require reference to auth.users, you can simply do
CREATE TABLE IF NOT EXISTS user_daily_usage(
 user_id UUID REFERENCES auth.users (id),
 email TEXT,
 date TEXT,
 daily_requests_count INT,
 PRIMARY KEY (user_id, date)
);
Then we need to authenticate the user for some backend APIs, if frontend directly uses Supabase.auth, how does the backend authenticate the user requests for other API calls?
To explain this, we need to understand how JWT (JavaScript Web Token) works.

You can test the encoding and decoding for JWT at https://jwt.io/. Once the user signed up/in with the auth server, he/she will get a JWT so if the user tries to load the website again within a short timeframe (before the token expires), he/she would not need to enter the password again.
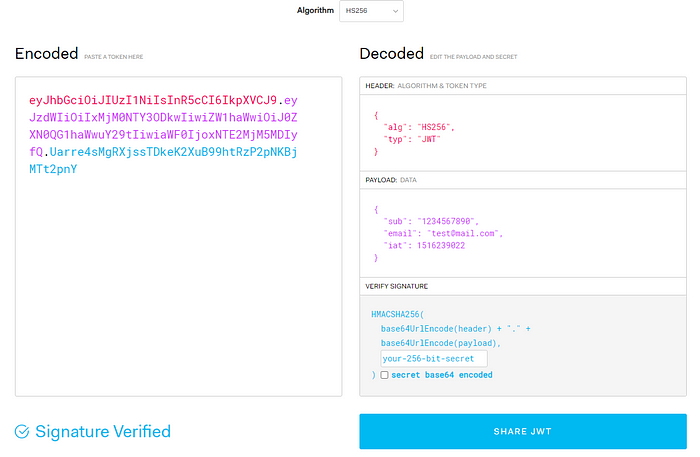
To generate a JWT for the user, you will need ‘sub’ which is the user Id (UUID that gets automatically assigned to the user from auth.users) and the email which was used for sign up.
So for auth server or backend to decode JWT, they will both need the 256-bit secret key. If you use Supabase auth, it’s called ‘Anon key’ from the admin dashboard. It will be the same key that you would use for the backend to decode JWT.
The auth module at FastAPI backend would look something like this:
import os
from typing import Optional

from auth.jwt_token_handler import decode_access_token, verify_token
from fastapi import Depends, HTTPException, Request
from fastapi.security import HTTPAuthorizationCredentials, HTTPBearer
from models import UserIdentity


class AuthBearer(HTTPBearer):
 def __init__(self, auto_error: bool = True):
 super().__init__(auto_error=auto_error)

 async def __call__(
 self,
 request: Request,
 ):
 credentials: Optional[HTTPAuthorizationCredentials] = await super().__call__(
 request
 )
 self.check_scheme(credentials)
 token = credentials.credentials # pyright: ignore reportPrivateUsage=none
 return await self.authenticate(
 token,
 )

 def check_scheme(self, credentials):
 if credentials and credentials.scheme != "Bearer":
 raise HTTPException(status_code=401, detail="Token must be Bearer")
 elif not credentials:
 raise HTTPException(
 status_code=403, detail="Authentication credentials missing"
 )

 async def authenticate(
 self,
 token: str,
 ) -> UserIdentity:
 if os.environ.get("AUTHENTICATE") == "false":
 return self.get_test_user()
 elif verify_token(token):
 return decode_access_token(token)
 else:
 raise HTTPException(status_code=401, detail="Invalid token or api key.")

 def get_test_user(self) -> UserIdentity:
 return UserIdentity(
 email="[email protected]", id="696dda89-d395-4601-af3d-e1c66de3df1a" # type: ignore
 ) # replace with test user information


def get_current_user(user: UserIdentity = Depends(AuthBearer())) -> UserIdentity:
 return user
import os
from datetime import datetime, timedelta
from typing import Optional

from jose import jwt
from jose.exceptions import JWTError
from models import UserIdentity

SECRET_KEY = os.environ.get("JWT_SECRET_KEY")
ALGORITHM = "HS256"

if not SECRET_KEY:
 raise ValueError("JWT_SECRET_KEY environment variable not set")


def create_access_token(data: dict, expires_delta: Optional[timedelta] = None):
 to_encode = data.copy()
 if expires_delta:
 expire = datetime.utcnow() + expires_delta
 else:
 expire = datetime.utcnow() + timedelta(minutes=15)
 to_encode.update({"exp": expire})
 encoded_jwt = jwt.encode(to_encode, SECRET_KEY, algorithm=ALGORITHM)
 return encoded_jwt


def decode_access_token(token: str) -> UserIdentity:
 try:
 payload = jwt.decode(
 token, SECRET_KEY, algorithms=[ALGORITHM], options={"verify_aud": False}
 )
 except JWTError:
 return None # pyright: ignore reportPrivateUsage=none

 return UserIdentity(
 email=payload.get("email"),
 id=payload.get("sub"), # pyright: ignore reportPrivateUsage=none
 )


def verify_token(token: str):
 payload = decode_access_token(token)
 return payload is not None
File Upload with Supabase
You will be able to directly call Supabase client library to upload files. A utility function can be written like the below:
import json
from multiprocessing import get_logger

from langchain.pydantic_v1 import Field
from langchain.schema import Document
from supabase.client import Client, create_client
import os
from dotenv import load_dotenv

load_dotenv()

logger = get_logger()

def get_supabase_client() -> Client:
 supabase_client: Client = create_client(
 os.getenv("SUPABASE_URL"), os.getenv("SUPABASE_SERVICE_KEY")
 )
 return supabase_client

def upload_file_storage(file, file_identifier: str):
 supabase_client: Client = get_supabase_client()
 # res = supabase_client.storage.create_bucket("quivr")
 response = None

 try:
 response = supabase_client.storage.from_(os.getenv("SUPABASE_BUCKET")).upload(file_identifier, file)
 return response
 except Exception as e:
 logger.error(e)
 raise e
Then a route for FastAPI
import os
from typing import Optional
from uuid import UUID

from auth import AuthBearer, get_current_user
from fastapi import APIRouter, Depends, HTTPException, Query, Request, UploadFile
from logger import get_logger
from models import UserIdentity, UserUsage
from repository.files.upload_file import upload_file_storage
from repository.user_identity import get_user_identity

logger = get_logger(__name__)
upload_router = APIRouter()


@upload_router.get("/upload/healthz", tags=["Health"])
async def healthz():
 return {"status": "ok"}


@upload_router.post("/upload", dependencies=[Depends(AuthBearer())], tags=["Upload"])
async def upload_file(
 request: Request,
 uploadFile: UploadFile,
 chat_id: Optional[UUID] = Query(None, description="The ID of the chat"),
 current_user: UserIdentity = Depends(get_current_user),
):

 file_content = await uploadFile.read()
 filename_with_user_id = str(current_user.id) + "/" + str(uploadFile.filename)

 try:
 fileInStorage = upload_file_storage(file_content, filename_with_user_id)
 logger.info(f"File {fileInStorage} uploaded successfully")

 except Exception as e:
 if "The resource already exists" in str(e):
 raise HTTPException(
 status_code=403,
 detail=f"File {uploadFile.filename} already exists in storage.",
 )
 else:
 raise HTTPException(
 status_code=500, detail="Failed to upload file to storage."
 )

 return {"message": "File processing has started."}
To be continued in Part 2…
If you are not familiar with FastAPI, this might be a bit cumbersome to figure out. But at the end of the Part 3, I will share the whole GitHub repo, it will be much clearer. Please stay tuned.
Join thousands of data leaders on the AI newsletter. Join over 80,000 subscribers and keep up to date with the latest developments in AI. From research to projects and ideas. If you are building an AI startup, an AI-related product, or a service, we invite you to consider becoming a sponsor.
Published via Towards AI
Related posts
Popular posts

 for 2021")


Updates

Recent Posts