Logo:
Logo:  Areas Served:
 From Code to Cloud: Building CI/CD Pipelines for Containerized Apps
Last Updated on March 4, 2024 by Editorial Team
Author(s): Afaque Umer
Originally published on Towards AI.
From Code to Cloud: Building CI/CD Pipelines for Containerized Apps
Introduction U+1F516
Imagine yourself as a Data Scientist, leaning in over your keyboard, sculpting Python scripts that decode the mysteries hidden within your dataset. Your algorithms hum with anticipation, your visualizations shimmer with insight, and you’re teetering on the edge of something truly remarkable. But hold on a moment — How do you share this ingenious code with the world? How can you ensure that your data science wizardry effortlessly reaches its intended audience?
Ah, the wild world of data science and machine learning, where algorithms roam free, and models hold the keys to unlocking the mysteries of the universe. But in this jungle of ones and zeros, there lies a crucial tool — MLOps, the superhero of streamlined development and deployment.
At the heart of MLOps lies the mighty Continuous Integration and Continuous Deployment (CI/CD) pipelines – the secret ingredients that morph your data science endeavors from local experiments into global phenomena. They make sure your models are ready for action without you lifting a finger.
So, In this blog, we’ll demystify CI/CD, explore its role in data science, and discover how it can elevate your projects to new heights. We’ll learn how to tame the beast of CI/CD for our projects, using Streamlit to navigate the frontend (think of it as our trusty GPS), GitHub Actions to automate like clockwork, and Docker Hub for containerized deployments (because who doesn’t love a good container?).
But wait, there’s more! We’ll even hitch a ride on Render, our free-of-charge hosting platform straight from the clouds. It’s like getting a first-class ticket to the data science galaxy without breaking the bank U+1F4B8.
Here is an overview of the blog’s structure, outlining the specific sections that will provide a detailed breakdown of the process:
Setting up Streamlit ApplicationDockerizing the ApplicationSet up GitHub RepositoryConfigure DockerHubDeployment in CloudCI-CD Implementation
Step 1: Create Your Streamlit App U+1F525
Let’s embark on creating a straightforward Streamlit application; our goal is simplicity. We’ll kick things off by constructing a basic Quote of the Day app leveraging the Forismatic API. Our initial focus will be on minimal functionality. Once we’ve completed this initial build and hosted it, we’ll move on to enhancing the layout in version 2. Then, we’ll push our code to test the implementation of CI/CD. Here’s the code for it U+1F447

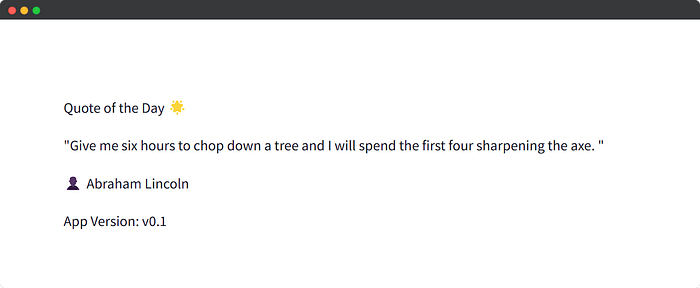
Here’s a preview of how the app will appear U+26A1
Now that we have the basic framework for our project, it’s time to initialize Git and set up a GitHub repository. But before diving into that, we’ll need to dockerize our application to facilitate integration with the CI/CD pipeline. Let’s proceed to the next step.
Step 2: Dockerize Your App U+1F433
Since our app is fairly basic and doesn’t require many dependencies or volume considerations, our Dockerfile will be a breeze to set up. But hey, if you’re just dipping your toes into the Docker world, fear not! I’ve got you covered with a beginner-friendly article on Docker. Check it out for some handy tips and tricks!
Docker Essentials: A Beginner’s Blueprint U+1F433
Upgrade your deployment skills with the Art of Containerization
pub.towardsai.net

This Dockerfile sets up a Python environment based on the Python 3.8 slim version, installs required dependencies from a requirements.txt file (here we have only one requirement streamlit), copies the project files into the container, and specifies the command to run the streamlit app.
Step 3: Commit, Push & Actions U+2699️
Alright, it’s time to take the next step and push our code to a GitHub repository. To do this, I’ll create a new repository on GitHub and push our code to the main branch. Once that’s done, I’ll set up an Actions file within the repository. This Actions file will essentially serve as our CI/CD pipeline. Whenever we push changes to the main branch, it will automatically trigger a series of actions. But before that….
What is CI / CD?
It’s a symphony that harmonizes development, testing, and deployment. Let’s break it down:
Continuous Integration (CI):
Imagine a backstage crew meticulously rehearsing your act. That’s CI. Whenever you push code to your repository (say, on GitHub), CI tools kick into action. They build your Python scripts, run tests, and ensure everything plays nicely together. If your code hits a sour note (bugs or errors), CI alerts you early, sparing you embarrassment during the grand performance. In a nutshell:
- Triggered on every push to the repository.
- Build your Docker image using a Dockerfile.
- Pushes the image to Docker Hub.
Continuous Deployment (CD):
Now, picture the curtains rising, the spotlight on you. That’s a CD. The CD takes your polished Python code and transforms it into a Docker image — a portable, self-contained package. Think of it as your data science show in a magical container. Next, CD whisks your Docker image to the cloud (we’ll use Render as our stage). Your app is live, accessible via a URL, and ready for its audience. The workflow is like:
- Triggered after successful CI.
- Deploy the Docker image to your production environment (here Render, can be GCP, AWS, AZURE instance).
- Executes any necessary setup (e.g. pulling the latest image, starting containers).
Okay, now navigate to the Actionstab in your GitHub repository. Here, you’ll discover a variety of pre-designed templates tailored to different project requirements. For our specific needs, we’ll opt for the Docker image template and tailor it accordingly. It’s important to note the structure of Docker image naming convention, which typically follows the format: username/image-name:tag. Here, the username refers to your Docker Hub username, image-name is the name of your image, and tag is an optional version identifier for the image.
In our case, let’s name our image quotedaily and assign it the version v1 (though this can be anything you prefer, serving as a tag for the image. It ensures that each time we build images on this branch, the new image will replace the previous one in the centralized repository). Here’s a preview of our actions file:
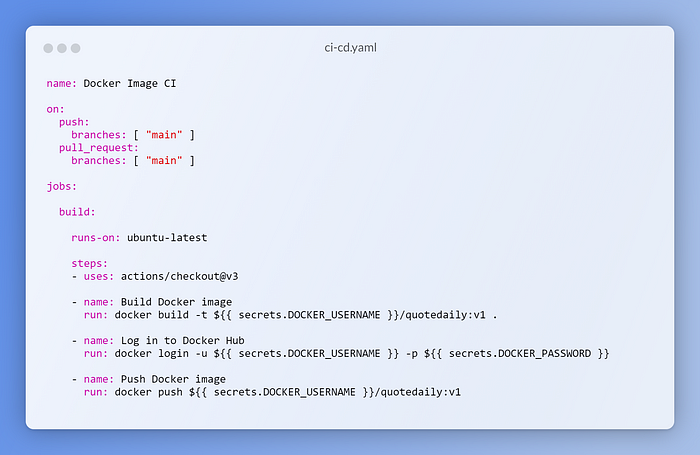
The above configuration triggers on pushes to the main branch and pull requests targeting the main branch. It consists of a single job named build (CI Pipeline) that runs on an Ubuntu latest environment. Within the build job, the steps include checking out the code, building a Docker image tagged as ${{ secrets.DOCKER_USERNAME }}/quotedaily:v1, logging in to Docker Hub using secrets, and pushing the Docker image to Docker Hub.
However, once we build and commit this, the Actions file will run and fail because we haven’t configured the necessary environment variables in the repository secrets.
Additionally, we haven’t set up the repository in Docker Hub for this purpose. Therefore, let’s proceed to create the Docker Hub repository and configure the secrets in the next step.
Step 4: Set up Docker Hub and GitHub Secrets U+1F510
Alright, this step is quite straightforward. You’ll need to log in to Docker Hub and create a repository with the same image name as defined in the configuration file above. Let’s proceed by signing in and creating the repository.

Now that we’ve created the repository on Docker Hub, it’s currently empty. To enable GitHub to push the Docker image to this repository, we’ll need to store our Docker Hub account credentials securely in the GitHub repository secrets. This will allow GitHub to log in to Docker Hub and push the image we’ve created to the repository. Let’s proceed by adding the credentials to the repository secrets.

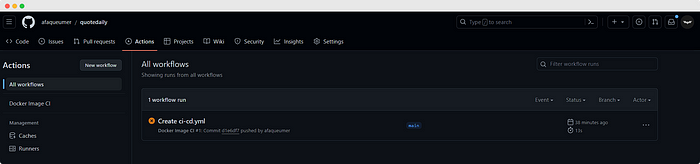
Now that we’ve configured all the secrets, it’s time to run the actions file. You can trigger the actions file by committing something to the main branch, or if there was a previous failed run, you can manually retry it from the Actions tab.

Voila! All jobs, including the build and push steps, ran successfully. But did it really happen? Let’s verify by checking the Docker Hub repository.

Oh yeah, our latest image is right here. Alright, we’re almost there, the CI pipeline is complete.
Now, we just need a place to host our container for the end game. We have a range of options depending on requirements and scaling needs. For this demo, I’m opting for a free hosting service, and I’ll be using Render, an awesome cloud hosting service provider that supports Docker Hub. Let’s set that up in the next step.
Step 5: Deploy to Cloud Hosting U+2601️
Here we’ll utilize Render for hosting our application. We’ll start by creating a web service to host our Docker image. A crucial consideration is network mapping, our image will run a Streamlit app, which typically operates on port 8501 (In render I guess it does automatically though). We’ll define this port in the service settings. Since we’re using a public repository from Docker Hub, no credentials are required here. However, for private repositories, setting up a username and token for Docker Hub is necessary.
Step 1: Sign Up and select the Web Service

Step 2: Select the Image from Docker Hub that you want to Deploy

Step 3: Some more inputs U+1F911….

Step 4: Deploy

and we are all done let’s hit the URL where the app is hosted:

And that’s it! It’s as easy as it gets. Now, take a look at the URL where it’s hosted, right below the image name. It may take a while, but once it’s ready, we can access our app directly from that URL. So, we’ve successfully deployed and hosted our app end-to-end. But wait, we’ve done this manually. What if we make changes in the main branch? Will the hosted app reflect these changes? Unfortunately, no. To update the hosted app, we’d need to manually deploy it again by selecting Manual Deploy and choosing the latest reference. Alternatively, Render provides an API webhook that, when triggered, performs the update process in the background. We can integrate this into our GitHub Actions under the CD pipeline. Once the CI pipeline is complete, we’ll run the deployment pipeline, fulfilling our destiny seamlessly.
Step 6: Building CD Pipeline U+27B0
Now, this step is quite similar to the previous one. We can locate the deploy hook URL in the settings of the Render web service. Next, we’ll need to add this URL as another secret within GitHub Actions. Additionally, we’ll create another job named deploy that runs after our build job completes. Adding secrets follows the same process as before. So, let’s edit the actions file accordingly. Here’s the updated actions file U+26A1

Along with that, let’s make some modifications to the Streamlit code. This way, when the actions run again, we’ll be able to determine whether our entire pipeline has worked successfully or not.
So once we are done with the commits and push the action will now have two job as pipeline U+1F447

How beautiful it looks! And now that our pipeline has run successfully, it’s time to check the ultimate prize. Let’s hit that URL and see if the app has truly been updated or if it was all just our fantasies.

Oh, how splendid! Here we are — our fully operational end-to-end CI/CD pipeline, meticulously crafted and thoroughly tested. And with that, it’s time to bid farewell.
Now, we have the power to code, commit, and serve — all in one plate. Alrighty, fellas, this has been a fun ride. But keep in mind, our journey doesn’t end here! This is just the beginning, akin to laying down the foundation. We can expand our setup by incorporating test cases, setting up monitoring pipelines, and more. Think of it as a set of Lego blocks, ready for you to assemble into magnificent structures. There’s endless potential waiting to be unlocked, so let your creativity flourish and build something remarkable!
Here is the link for the repo for reference:
GitHub – afaqueumer/quotedaily
Contribute to afaqueumer/quotedaily development by creating an account on GitHub.
github.com
I hope you enjoyed this article! You can follow me Afaque Umer for more such articles.
I will try to bring up more Machine learning/Data science concepts and will try to break down fancy-sounding terms and concepts into simpler ones.
Thanks for reading U+1F64F Keep learning U+1F9E0 Keep Sharing U+1F91D Stay Awesome U+1F918
Join thousands of data leaders on the AI newsletter. Join over 80,000 subscribers and keep up to date with the latest developments in AI. From research to projects and ideas. If you are building an AI startup, an AI-related product, or a service, we invite you to consider becoming a sponsor.
Published via Towards AI
Related posts
Popular posts

 for 2021")


Updates

Recent Posts